
Update: 2018-OCT-01 – This post applies to VMware Fusion version 8.x and older. Updates were made in VMware Fusion 10 to make it easier to create a UEFI-enabled VM from the GUI.
Let’s say you want to build a new VMware Fusion virtual machine using the newer UEFI firmware instead of the traditional BIOS. How is that done in VMware Fusion? Unlike VMware Workstation and ESXi, there’s no GUI-based option to choose EFI over BIOS (at least as of this writing). So, I decided to put this post together to walk you through the process. I should also point out that this needs to be done before an operating system is installed to the VM.
If you’re not sure what the differences are between UEFI and BIOS, How-To-Geek has two great articles that explain how newer UEFI firmware differs from traditional BIOS; “What Is UEFI, and How Is It Different from BIOS?” and “What You Need to Know About Using UEFI Instead of the BIOS.”
It’s pretty simple to tell if your VM is running BIOS or UEFI simply by looking at the boot screen. When you power on your VM, the boot screen will look like one of the following screenshots:


Before We Begin, Install a Quality Text Editor
Before diving into the meat and potatoes of creating a UEFI-enabled VM, I highly recommend installing a more robust text editor, like TextWrangler. (That is, if you don’t already have one installed). Feel free to use the plain text editor of your choice, but I suggest you shy away from using TextEdit, Word, or Pages just to be safe, as they may tweak the formatting of the text.
Create a New Virtual Machine
Open VMware Fusion and create a new virtual machine. After the VM is created, but before installing an operating system, we’ll need to make a change to the virtual machine’s *.vmx file.
-
- If the VM is powered on, shut it down or power it off. From the menu bar, select Virtual Machine > Shut Down and click Shut Down in the confirmation dialog.


- If the VM is powered on, shut it down or power it off. From the menu bar, select Virtual Machine > Shut Down and click Shut Down in the confirmation dialog.
- From the Virtual Machine Library window, right-click on the VM and choose Show in Finder. Ignore the Finder window for now, as we’ll come back to that in the next section.

- I also recommend quitting the VMware Fusion app just to be safe. From the menu bar, select VMware Fusion > Quit VMware Fusion.

Edit the *.vmx File to Enable UEFI
-
- In the Finder window that appeared in the previous step, locate your VM, right-click, and choose Show package contents.
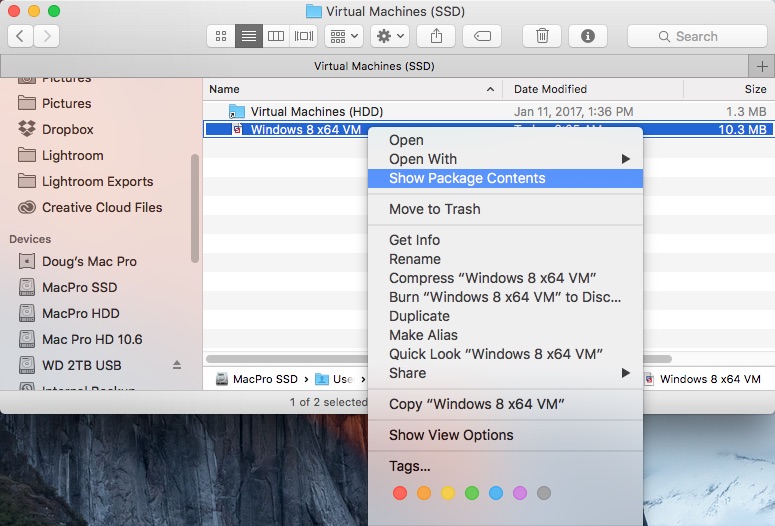
- In the Finder window that appeared in the previous step, locate your VM, right-click, and choose Show package contents.
-
- In the contents of this package are a number of VM-related files and folders. Look for the file that ends with .vmx (Such as Windows 8 x64.vmx).
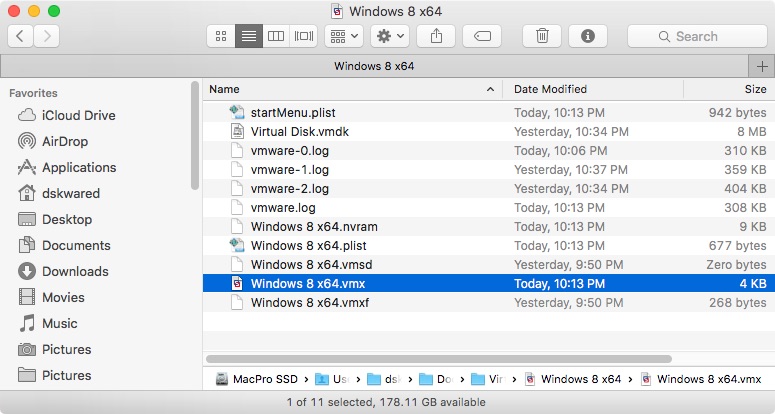
- In the contents of this package are a number of VM-related files and folders. Look for the file that ends with .vmx (Such as Windows 8 x64.vmx).
-
- Right-click on the *.vmx file and open with your preferred text editor.

- Right-click on the *.vmx file and open with your preferred text editor.
- In the text editor, insert the following line of text: firmware = “efi”

I typically add firmware = “efi” on line 4 of the VMX file. - Save the changes to the *.vmx file and proceed with the installation of the guest OS! You should now see the UEFI firmware screen whenever the VM is powered on.

UEFI Firmware
Update: 2019-APR-10: There continues to be quite a bit of interest in this particular blog post, so I put together a YouTube video that walks through this process in both VMware Fusion 8.x and 10.
And there you have it! I hope this post helped you figure out how to create a new UEFI-enabled VM in VMware Fusion! As always, thanks for stopping by!

Thanks a bunch! Was indeed struggling to find this option in vmware fusion pro.
LikeLiked by 1 person
Sure thing, Tom! I’m glad you found this post helpful!
LikeLike
Thanks! I have Windows installed on a separate drive in my Mac Pro so Fusion wouldn’t import it automatically as a Bootcamp drive, so I made a custom virtual machine and a raw disk VMDK with rawdiskCreator. But it wouldn’t boot. My first suspicion was the VM not being in EFI mode but I couldn’t tell for sure. Adding firmware = “efi” was all it took. Now my VM boots. Thanks!
LikeLike
Glad to hear it, Reed!
LikeLike